ORGANIZED GARAGE TOUR!
This article is reprinted from this website, for more details, please refer to this blog
I never knew I could be so excited about a garage, but friends, I AM SO EXCITED ABOUT A GARAGE! At the beginning of this year, our garage was the WORST.
See Exhibit A:

Bad, right?! Eeek.
I knew we could whip this space into shape, and while it may have taken a while, I’m thrilled to say that it is finally finished, and I couldn’t be happier with the results!
While I was organizing our garage, I wanted to make sure I could also help you organize your garage, so I made you a little Garage Organization Planning Guide, and you can download it for free by clicking this button:
Let’s jump right into the big reveal!
HOW TO ORGANIZE A GARAGE
This post contains affiliate links. For more information, see my disclosures here.
Shelves and bins and labels, oh my! 😉 So many of my favorite organizing things are in this space, so I’ll break it down step by step so that you can see how we got from the oh-so-messy “before” to the super happy “after.”
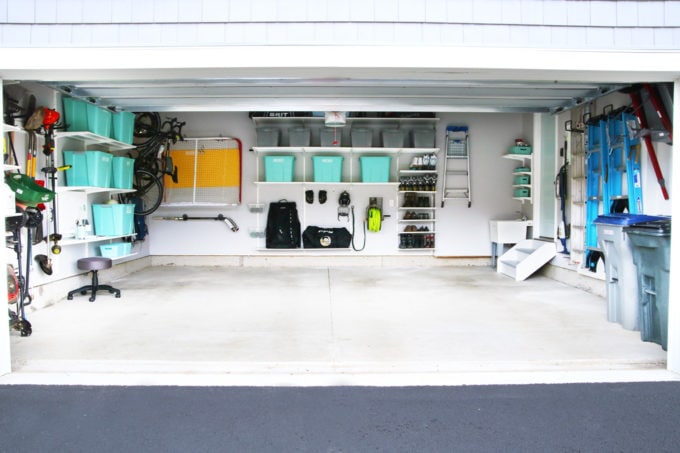
OUTER GARAGE WALL
There is a lot to talk about with this project, so I will start on the outer wall of the garage and work my way around!
STORING LAWN AND GARDEN TOOLS
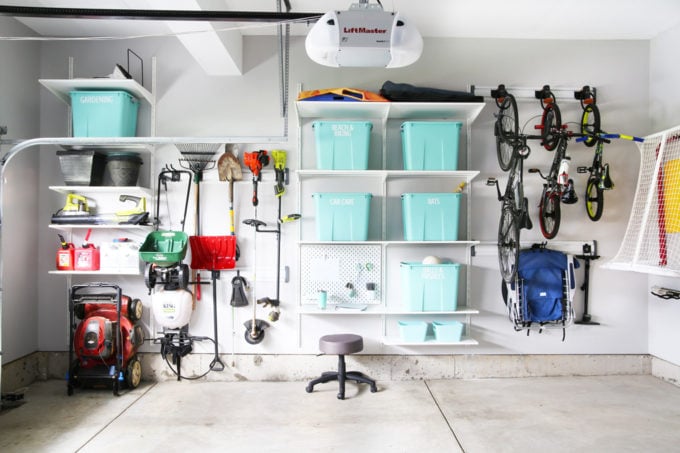
The first section of this wall is dedicated to our lawn and garden tools.

Our fold-up lawn mower is a slightly different version of this one.
Since Donnie mows, fertilizes, and uses the weed whacker just about every week when the weather is nice, it was important to have all of these tools in a spot that is easy to reach and within close access to the garage door so he can get everything outside.
We decided to go with the IKEA ALGOT shelving system with metal shelves (you can read about why in this post) to hold smaller items and containers. If you’re looking to design an ALGOT shelving system for your own home, I talk about how we design ours in this post and this post.
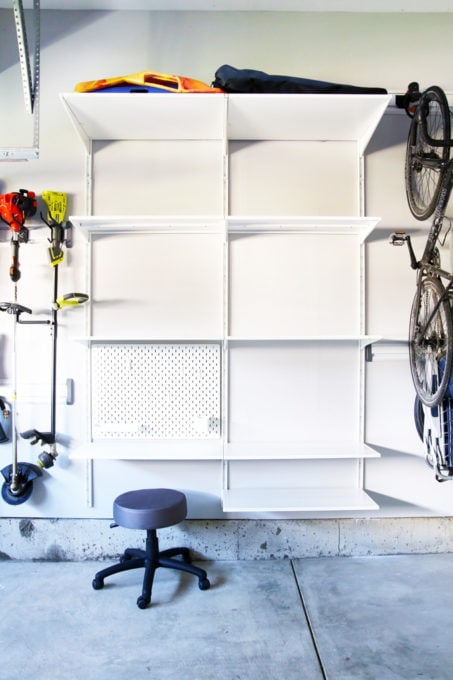
For larger and more awkwardly shaped items that needed to hang, we used the Gladiator brand track system, which allows us to add various types of hooks to hold all sizes and shapes of items.

CREATING A GARAGE WORKSTATION
Donnie had requested a work surface for the space for when he’s working on projects in the garage, so we put in a standard ALGOT shelf on this segment of the wall, with a stool that stores neatly underneath. We also included an IKEA SKADIS pegboard where we can clip up notes for projects we’re working on and hold pens and other small supplies.

STORAGE BINS AND LABELS
This section of shelving also holds many of the boys’ outdoor toys, along with some of our beach and camping supplies. We were sure to keep the boys’ items down low so that they could reach them easily when they go out to play. The items we use less often are up higher.
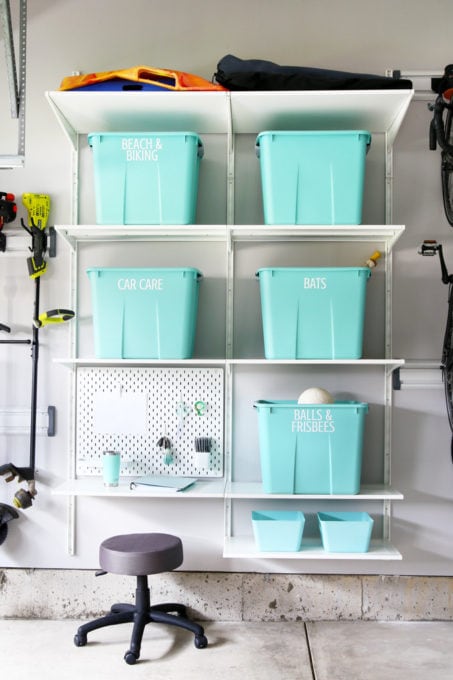
I found these awesome aqua bins at Target, but I grabbed them right at the end of the season, so sadly, they’re no longer available online. (Some stores may still have a few in stock, so it’s worth a check!) I found these ones that are similar as an alternative as well.
To label the bins, I used my Silhouette Cameo cutting machine and white adhesive vinyl. I have a tutorial about how I make these types of labels here.

HOW TO STORE BIKES ON A GARAGE WALL
Bikes were one of the things that we knew would be trickier to store since they are awkwardly shaped and take up a lot of room. We needed them to be out of the way but also easy enough to get to that it wouldn’t be a pain when we wanted to use them.

We decided to go with the Gladiator track again, and they had the perfect attachment that allows us to get the bikes up and down easily.


GET 200+ PAGES OF FREE PRINTABLES!
Become one of our VIP newsletter subscribers and gain access to our exclusive free printables vault!
GARAGE BACK WALL
Moving on to the back wall of the garage…
STORAGE FOR HOCKEY EQUIPMENT
One of my top priorities for our garage organization project was to figure out a way to store ALL of the [smelly] hockey gear that had infiltrated my house!
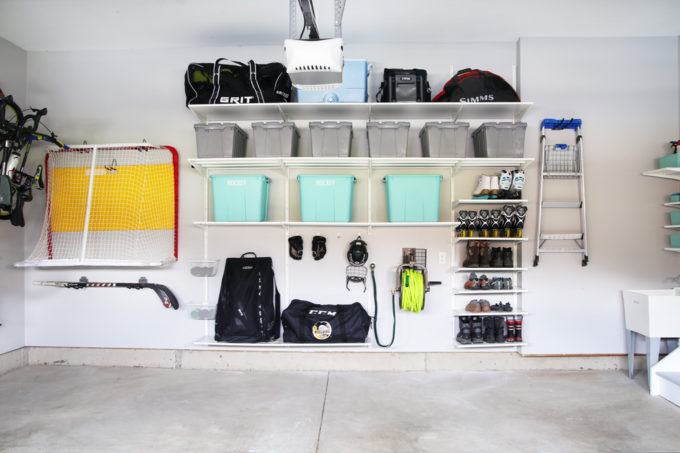
First, we used wall hooks to hang up the net that we use in the driveway, along with a yellow shooting pad that also acts as the stand-in goalie. We made sure the net was up high enough that the hood of the car would fit under it, but low enough that it was easy to grab. Two more sets of wall hooks hold all of the hockey sticks below the net.

The next part is my favorite because it holds all of the hockey bags which used to inevitably end up in my dining room or our guest room!

These are still the IKEA ALGOT shelves, with Connor and Caleb’s bags on the lowest shelves so they can get them up and down themselves. Above Caleb’s bag, we installed some hooks where we can hang sweaty gear to air out. (If you have ever smelled sweaty hockey gear, you understand why this was necessary! 😉 )

IKEA makes these nifty little baskets that hook right on to the ALGOT rails, so I was able to store a stash of hockey pucks there so the boys can grab them easily.

Donnie uses his hockey gear less often, so it is fine up high; it’s easy for him to grab the ladder to get the bag down when he needs it. We also have a few bins of spare hockey gear that we’re waiting for the boys to grow into.

STORING FISHING GEAR
Donnie had been storing his fishing gear in his office, and (much to my chagrin) in our master closet, so we wanted to be sure to give it a better home out here in the garage.
For some reason he didn’t like the idea of storing his fishing gear in cute aqua tubs (I have no idea why!), so we got these gray ones for him, and they are working out well. The rest of the top row of shelves not taken up by his hockey bag holds the remainder of his fishing gear and a few coolers.

STORAGE FOR SHOES, BOOTS, AND ROLLERBLADES
We keep our day-to-day shoes inside, but our “muddy shoes” and boots are stored in the garage, along with rollerblades for everyone in the family and my ice skates since I don’t keep them in a hockey bag like everyone else. The final section of the shelving on this wall has several shelves for all of the shoes, skates, and blades.

PS… If you’re wondering what the hose is doing in the midst of all of our sports/outdoor equipment, we really didn’t have a choice. The hose bib (or spicket if you’re from Pittsburgh 😉 ) was already installed there, and it would have been a massive pain to move it. Fortunately the ALGOT shelving was flexible enough that we were able to work around it. We used a hose reel to keep the hose as contained as possible.
Finally, we have one light duty ladder that we use all the time, so we hung it on a hook on this wall, which is near the entrance to the house so we can easily grab it and use it when we need it.

Related: How to Clean and Organize Hockey Equipment
GARAGE INNER WALL
Moving on to the final wall of the garage…

SHELF STORAGE FOR CLEANING SUPPLIES
We put a small section of shelves (ALGOT again) above the utility tub to hold some cleaning supplies in my favorite y-weave bins.

I was way too excited when I discovered that the two bins on the lowest shelveswere the perfect size to store a roll of garbage bags! The bags stay neatly tucked away but are still convenient to grab one when I need it, and then the next one sits there, ready and waiting for me. It really is the little things!

GARAGE PAINT COLORS
I love a pretty detail, so I painted the door going into our mudroom my favorite shade of aqua and also painted the steps white with gray treads.

And speaking of paint, I should mention that before we hung any of our shelving, we did have someone come in and paint the walls (Behr Marquee Silver City, my favorite gray) and ceiling for us.
(I am typically the painter in our house since Donnie does all of the other handy things, but the ceilings were so high in this space that I was nervous about doing it myself, so we hired it out.)
The walls were previously unfinished drywall, and we made the decision not to mud and finish off the drywall before we painted. It would have taken hours of tedious work, and we knew we were going to cover up the walls with shelving anyway.
(Plus, it’s a GARAGE! It’s not like we’re hanging out here and admiring the walls!) So if you look closely behind the shelving, you can see the drywall seams, but we are totally fine with our decision to leave it that way!
USING A PEGBOARD TO STORE MOPS AND BROOMS
For the size of our house, the closets are pretty small, so I struggled to find a great place to store our mops and brooms. We ended up using another SKADIS pegboardwith hooks on this small piece of wall, and it has been the perfect solution. There is also a dispenser for holding plastic grocery bags so that we can reuse them.

HOW TO STORE LARGE LADDERS
This wall was a bit tricky because it has a bump out that not only limited what we could put on either side of it, but also constrained what we could store on it. Since we wanted to be able to park both of our cars in here, whatever we put on the bump out couldn’t stick out too far or it would be tough to get our car doors open.
Ultimately, this ended up being the perfect spot to store our heavier duty ladders, again using the Gladiator track system with this attachment. The three ladders fit perfectly horizontally, and they aren’t very deep, so bumping the car doors is not a problem.

HOW TO STORE LARGE, BULKY ITEMS LIKE A WHEELBARROW
The final little corner of the garage holds our garbage can and recycling bin and also provides a spot for another tricky item to store– the wheelbarrow.

The wheelbarrow is heavy and huge, and though we don’t use it very often, it is something we needed to keep around to use occasionally. We were totally baffled as to the best way to store it until we found this simple wall bracket.

The lip of the wheelbarrow simply sits down into the bracket, and the handles help to lock it in place so it’s sturdy, keeping it accessible but still out of the way.
Finally, we used one more set of wall hooks to hold the bike rack attachment that hooks to the hitch on the back of our car. And then we were done!

MESSY GARAGE TO ORGANIZED GARAGE – BEFORE AND AFTER
It took months of working on it off and on, but I am absolutely thrilled with our finished garage space! Let’s take a look at the before and after:
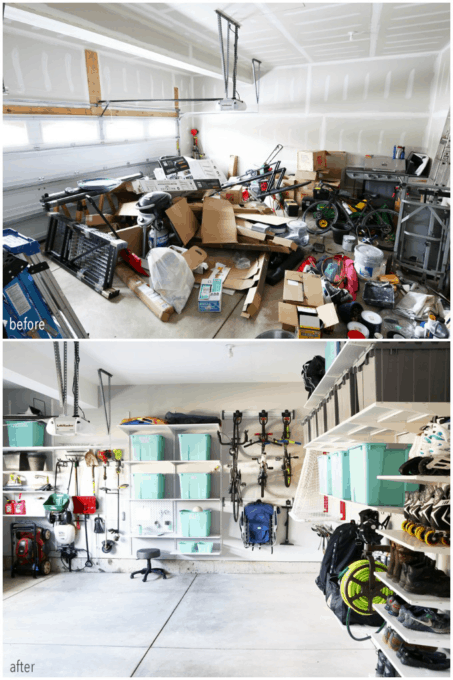
And of course I couldn’t end this post without a photo of both cars parked comfortably in the garage because I am so excited that we won’t be parking out in the cold Pennsylvania tundra this winter! WOOHOO!

I may or may not have done a happy dance on the day when we pulled both of the cars in for the first time. (And there happened to be utility guys working on our street at the time, so I’m pretty sure Donnie was totally embarrassed, but I didn’t even care. This was worth celebrating! 🙂 )


