This article is reprinted from this website, for more details, please refer to this blog
https://www.farmandfleet.com/blog/install-an-electric-garage-heater/
No matter where you live, there are bound to be times when you can’t wait to finish a project, but it’s too cold in your shop. By installing a versatile electric space heater, you’ll be able to spend hours finishing that project in your garage, basement or workshop – no matter what time of year or temperature.
Find an Electric Garage Heater at your local Blain’s Farm & Fleet store today.
Thanks to the experts at Farenheat, you’ll find easy instructions on how to install an electric garage heater in your shop. Before you begin to install your new heater, be sure you properly inspect it for any damage. Check the contents to make sure you have the heater and mounting bracket. If anything is damaged or missing, contact your local Blain’s Farm & Fleet store. You will also need the following items to install your heater:
- Screwdriver
- Needle Nose Pliers
- Pliers
- Electric Drill with 1/4″ bit
- Adjustable Wrench
- Enough properly sized insulated copper conductor wire to run power from the breaker or fuse to the heater
- Proper size fuses and circuit breakers
NOTE: Check your local electrical codes before beginning and be sure all electrical power is disconnected at the main service box before you start to install your heater.
Location of Your Electric Garage Heater:
When you look for a place to mount your heater, make sure the spot and the screws or bolts you use are strong enough to support the weight of the heater and mounting bracket. Install the heater at least 6′ off the floor in a low traffic area. Make sure there are no objects around your heater that could block it’s air flow. If you are using more than one heater, make sure each heater supports the airflow of the others as indicated below.

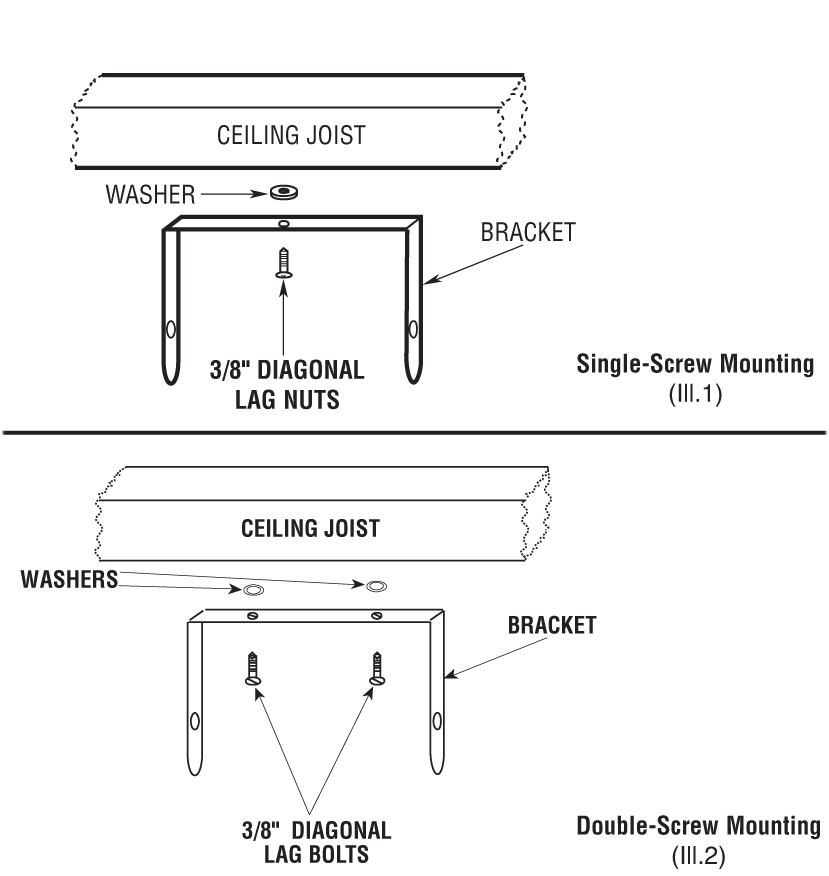
If you’re going to mount your heater on the ceiling, attach the mounting bracket to a ceiling joist.

Once you mount the bracket, attach the heater to it. If you’re going to tilt your heater downwards, make sure the screws on the mounting bracket line up with the bottom keyhole slot. Tighten the screws with a wrench so the unit holds firmly at the desired angle.
Connecting Your Electric Garage Heater to Power:
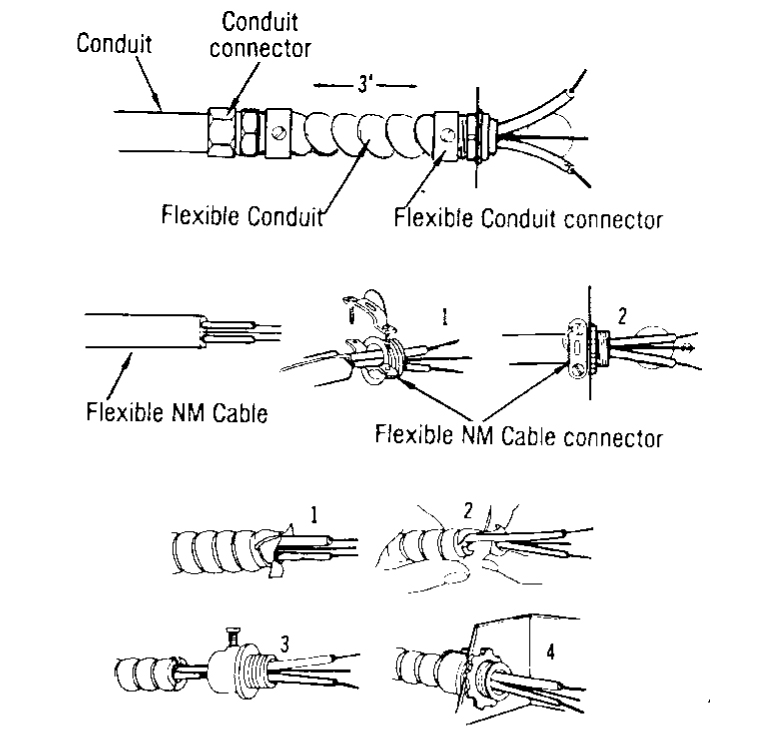
To connect the power to the heater, remove the screw from the front of the unit. This will let you open the bottom to access the electrical wiring and connectors. Next, attach the cable connectors to the unit. Slide the correct-sized wire through the connector and make sure you have enough wire to work with when you make the connections. Use the figure below as a guide. You can use flexible NM cable or flexible conduit to run power to your heater.
Flexible Non-Metallic (NM) Cable
1. After stripping the end of the cable, slide the cable through the connector on the bottom of the box.
2. Tighten down the flexible NM cable connector to hold the cable in place.
Flexible Conduit
1. Use your pliers to make a tear in the outer conduit.
2. Peel some of the conduit back until you’ve exposed enough cable to make the connection.
3. Slide the cable through the connector on the heater.
4. Tighten down the flexible conduit connector to hold the cable in place.

Next, hook the wires up to the terminal block on the heater and turn on the power.
Operating Your Electric Garage Heater:
NOTE: The first time you operate the unit, it may smoke slightly. This is normal and does not indicate a problem with the unit. It will stop after the heater has been operating for a few minutes. The smoke is from a cleaning agent residue that’s burning off.
Turn the thermostat knob clockwise to the “high” setting. Once the room feels comfortable to you, turn the knob back until the thermostat clicks off. The fan may keep running until the heater cools down. The heater will now cycle on and off to maintain this temperature.
A fan delay keeps the heater fan from turning on until the heating elements are warm. This prevents the heater from blowing cold air. Most heaters come with an auto shutoff to keep it from overheating. If your heater does automatically shut off, it will start again once it cools down.
You can adjust the direction of the air flow turning or tilting the heater. Simply adjust the bracket screws to hold it in place after you get it set.
Electric Garage Heater Maintenance
An electric garage heater doesn’t require much maintenance. With seasonal cleaning, your it should last a lifetime.
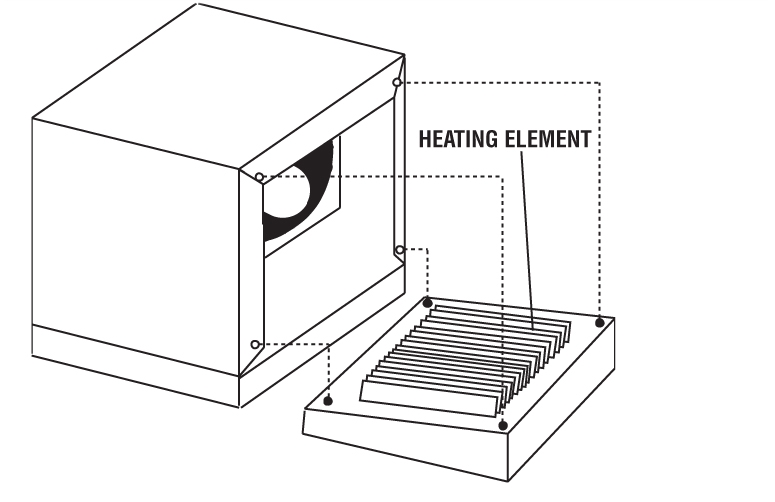
To clean the heating element, loosen the screws behind the front panel. There should be one on each corner of the heater’s shell. Grab the front panel on both sides, lift it up and pull it out. This gives you access to the heating element. Remove any dust or lint with a soft brush or vacuum cleaner. Replace the front panel and re-tighten the screws.

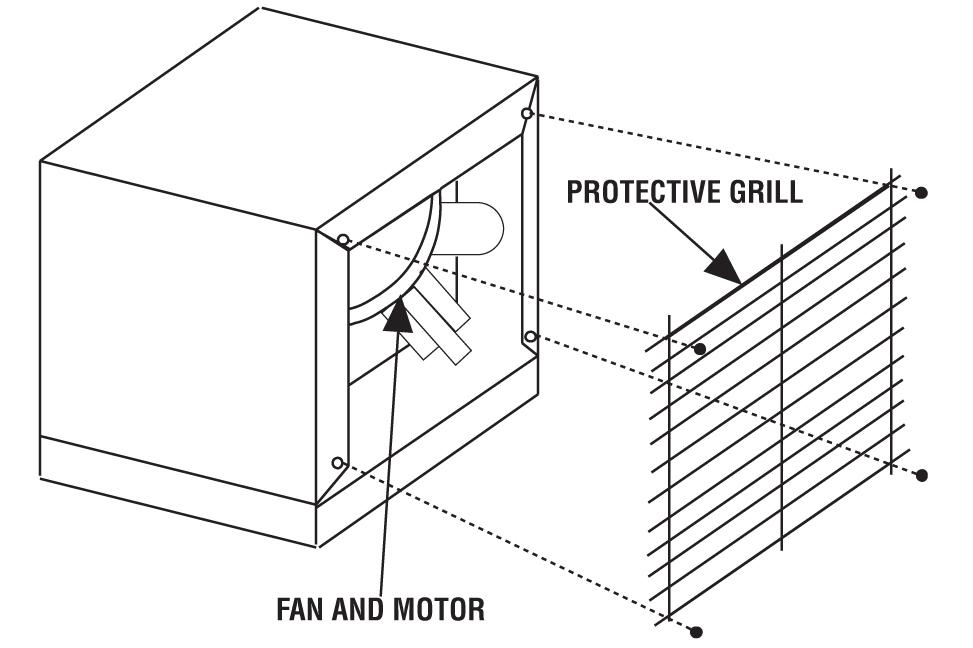
To clean the fan and motor, remove the protective grill from the back of the heater. This will give you access to the fan and motor. Wipe off the fan and motor with a soft cloth or brush. The fan motor does not require lubrication. Replace the grill and tighten it back down.

Tips from Farenheat Experts.

