

How to Build a Pegboard Wall
This article is reprinted from this website, for more details, please refer to this blog.
I have always loved the idea of using pegboards to organize a space but, for some reason, I have never used one in our home…until now! Last week, I showed you how we were using a large {6×8} pegboard in our garage to organize all of our sports equipment and today we will actually be talking about how to build a pegboard wall.
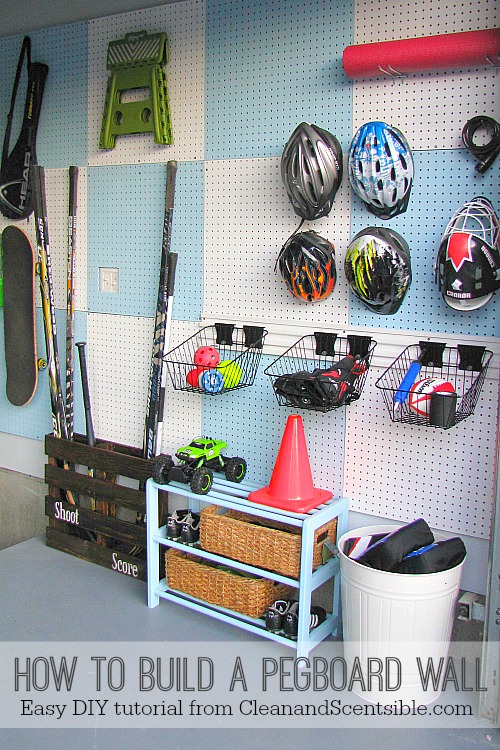
Pegboards are fabulous for organizing all of those little items that you are not quite sure what to do with. Craft supplies, tools, sporting gear, kitchen gadets – a pegboard can pretty much hold it all and allow you to easily find what you are looking for. Pegboards can be used in pretty much any space. They are inexpensive to buy, can easily be cut down to any size, and are in an easy DIY project to install. What could be better?
MATERIAL
- Pegboard {we used 12 2×2 pieces that we cut down from 4×8 boards}
- Pine 1×2 boards
- Miter saw
- 3 inch wood screws
- Plastic anchors {if you are unable to mount to studs}
- Stud finder
- Screw gun or drill
- 3/4-inch wood screws and washers
- Paint {we used Behr Marquee Paint in Balboa and Behr Paint in Pure White}
- Hooks and holders {ours were purchased from Home Depot}
DIRECTIONS
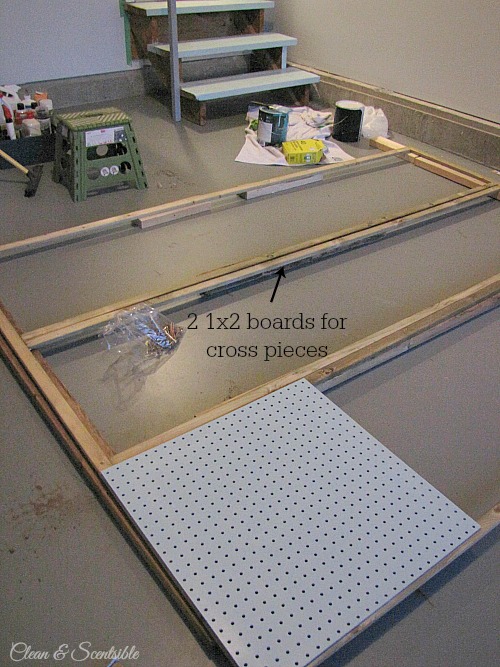
- Cut and paint your pegboard. We purchased the pegboard in 4×8 sheets and I had them cut down at the store into 2x2s so I could fit them in my car. While it was easier to paint them this way since I was doing a checkerboard pattern {I spray painted mine with a sprayer}, they would be a little easier to mount to your frame if you leave them in the larger sheets.
- With the 1 x2 boards, build a perimeter frame to the size of your pegboard. We just used a miter saw to cut down the 1 x 2s to the required size. The frame is needed to allow room behind the pegboard for the hooks. Our total board size measured 8 feet x 6 feet. Because we were using 2×2 pegboard pieces we also needed to add 2 cross pieces {again using the 1×2 boards} every 2 feet to mount the boards to. Lay out all of the pieces out on the floor {ours are raised up on 2x4s in case you are wondering} to make sure the measurements are correct and then screw them together using the wood screws.
- Mark where the studs are on the wall and mount the frame to the wall using screws {we used 3 inch screws into the studs}. If you are unable to screw into studs, make sure to use plastic anchors for the drywall. Use a framing square and/or a level to ensure that the frame is level and square at the corners.
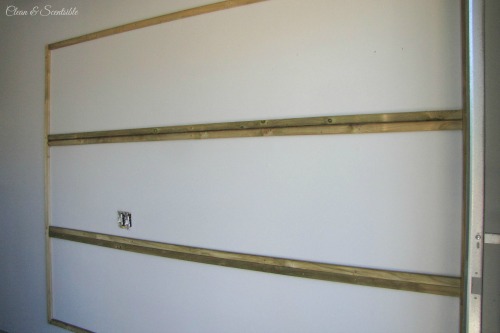
- Using 3/4 inch screws and a screw gun, mount the pegboard onto the frame. Starting in one corner, align the outer edges of the pegboard and space the screws evenly. We had to use a jigsaw on one of our pegboard pieces to cut a small square to accommodate a light switch.

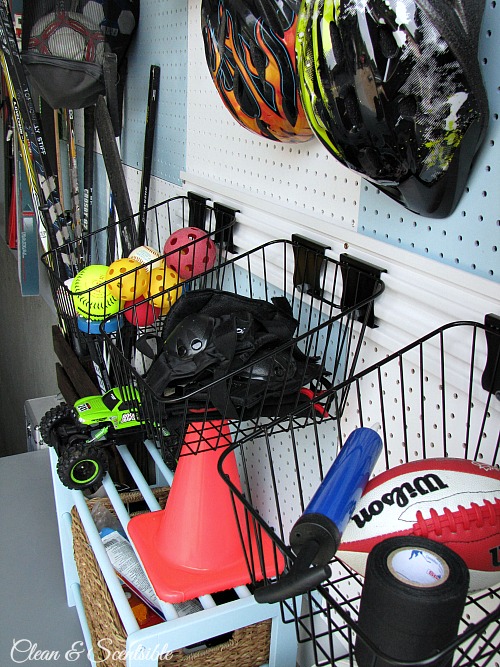
- Add hooks, holders and bins to hold your gear and admire your work!
To see all of the details of our pegboard organization system, check out this post HERE.

And stay tuned for the full garage reveal soon!